Top 10 Best ‘Smallest’ ATX Cases for Compact PC Builds
| Dimensions | "395mm x 212mm x 440mm |
| Motherboard | 413mm x 217mm x 453mm : with feet/screws/protrusions" |
| 3.5” Drive Mounts | Micro-ATX, ITX, ATX |
| 2.5” Drive Mounts | 2 (combo 3.5″ or 2.5″) |
| Fan Support | 3 |
|
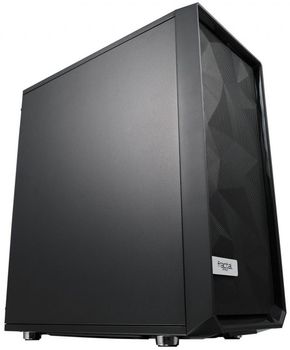
Building their reputation from their mid-priced, yet high-quality PC cases, Fractal Design also introduced their lightweight models at reduced prices later on. Some of the keys feature that Fractal Design’s PC cases usually have like the anodized aluminum front panel and the asphalt sound damping was dropped to reduce the prices. However, those cases still have the firm’s classic solid face design. Adding a glass panel wasn’t enough for Fractal Design, so they went on to meshify their Fractal Design Meshify C PC case.
Now that the front panel is a mesh instead of a solid front panel which was used in previous designs that would reflect some of the noise produced by the components back into the case, so this case may be slightly more noisy. The intake fans in the front don’t have to draw air through the thin slots located on the sides of the front panel, this means that Fractal Design Meshify C will probably be able to keep your components a little cooler. The automatic fan controllers usually turn down the fans on the systems that manage to keep the temperatures in check, so a good cooling to noise ratio may be achieved.
Fractal Design Meshify C PC case’s front panel is not smooth and is angled in different directions instead. The company claims that this increases airflow, but more likely benefit is that ripples won’t show on it like they often do on a flat panel.
The front I/O ports are located at the top of the front panel that features two USB 3.0 ports, a microphone jack, a headphone jack, a reset button and a power button. There is a mesh panel on the top of the case just behind the front I/O ports which is fixed by magnetic strips.
On the bottom of the case, there is a full-length bottom dust filter that slides in from the front and covers both the power supply inlet and an optional intake fan.
Related: Best Mini ITX Cases
On the back side of the Fractal Design Meshify C PC case we have a removable power supply flange, just above it are seven expansion slots that have screw-on covers, and above that is a slide-able fan mount. The removable power supply flange allows the builders to put the power supply in from the back of the case and the exhaust fan’s screw slots allow the builders to make enough room for single-fan radiators. The 3.5″ removable drive cage limits the power supply mounting depth to 8.9″ with the cables.
The front panel comes off and reveals a removable center panel with encapsulated foam dust filter and also reveals the mounting locations for 2 x 140mm or 3 x 120mm radiators and fans. There is a single 120mm fan included.
The builder can remove the 5.4″ removable panel which will provide enough room so that the Fractal Design Meshify C can support a large radiator. So, you don’t need to worry about space, even though the case is a little compact for an ATX PC case, but the case has plenty of space.
The dark tinted side glass panel does a great job to suppress the excessive brightness of the lighting inside the PC case and kind of also helps to conceal component color mis-match.
| Dimensions | "395mm x 212mm x 440mm |
| Motherboard | 413mm x 217mm x 453mm : with feet/screws/protrusions" |
| 3.5” Drive Mounts | Micro-ATX, ITX, ATX |
| 2.5” Drive Mounts | 2 (combo 3.5″ or 2.5″) |
| Fan Support | 3 |
|
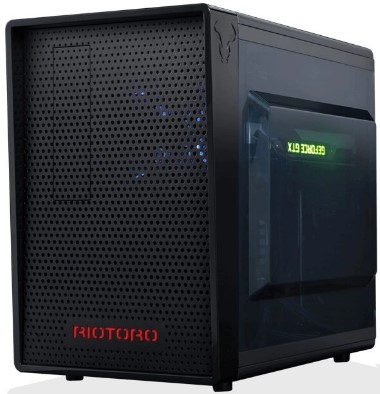
Being one of the shortest full ATX case, Riotoro calls it a mid tower case while they brag about how compact the case is.
Since the power supply is supposed to be placed behind the motherboard tray, so Riotoro didn’t need to worry about component stack height in the Riotoro CR1080 PC case design.
There is a 5.25″ bay on the front panel of the Riotoro CR1080 and the front I/O panel is located just behind it on the top of the case. It features two 3.0 USB ports, a microphone jack, a headphone jack, a reset button and a power button.
The Riotoro CR1080 PC case puts the power supply behind the motherboard tray, unlike the pavilion-style cases. There is an additional 0.5″ of space available on the side panel window in order to provide additional CPU cooler clearance. There are seven expansion slots and an empty 80mm fan. There are two knock-outs below the fan mount which provides a pass-through option for the tubing of external liquid coolers and the intake vent for the power supply can be seen on the left-side panel.
Removing the side panels reveal the interior of the case which has a black color. The Riotoro CR1080 has a fairly large power supply bay with the drive bays located above it. The case has an 80mm fan mount seen on the front panel and some may be able to notice that there is another 2.5″ SSD mounting location on the back of the motherboard tray.
The swing-out rear drive tray can hold a 3.5″ drive on top and a 2.5″ drive on bottom or it can hold two 2.5″ drives on both top and bottom. There is a slide-in front tray that can support a single 3.5″ or a single 2.5″ drive. The Riotoro CR1080 PC case also has three 2.5″ drive mounting holes that are located just below the 5.25″ bay on the motherboard.
Those builders who want to use the 2.5″ drive mounts that are on the motherboard tray should probably mount the drive before installing the motherboard, because a standard ATX motherboard will cover two of the drive’s mounting screw holes. The Riotoro CR1080 PC case’s motherboard tray is large enough to hold a 10.6″ deep enthusiast boards which are usually called as EATX and it will still leave 2.1″ of space for a radiator and front fans.
If you remove the front panel of the Riotoro CR1080 PC case, you will see two adjacent 120mm fan mounts with enough space above and below in order to clear the end caps of most 2 x 120mm radiators. If you use a large enough cooling solution, then graphics card selection becomes critical as the 12.7″ internal depth include fans.
There are holes on the bottom panel of the Riotoro CR1080 PC case that can support two 120mm fans, but there is no air filter and there’s not much space to put one there. There is just 1″ clearance between the motherboard’s edge and bottom panel, so a radiator can’t be added to those fans.
| Dimensions | 210mm x 360mm x 366mm |
| Motherboard | Micro-ATX, Mini-ITX, ATX |
| 3.5” Drive Mounts | 2 |
| 2.5” Drive Mounts | 2 |
| Fan Support | 4 |
|
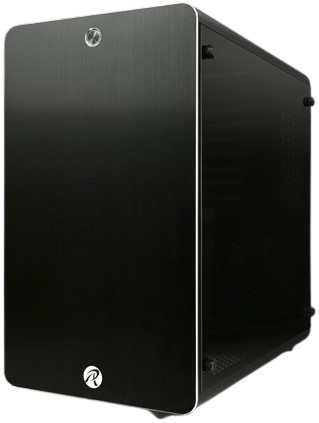
If you have seen the Raijintek Styx, then the Raijintek Thetis will just look like a larger version which allows support for an ATX motherboard in a compact form factor. The Raijintek Thetis comes in either black or silver.
RIght of the bat, you can tell that the internals of the Raijintek Thetis PC case are flipped upside down, since the windowed side panel is on the right side of the case instead of the left side which is the traditional design. The Raijintek Thetis has a brushed aluminum, flat front panel with a power button on the front and there is a metal mesh on the top of the case.
The front panel of the Raijintek Thetis PC case has diamond-cut edges just like all other cases of this family. On the back of the Raijintek Thetis PC case, the expansion slots are located above the rear I/O.
There is a Raijintek logo at the bottom of the front panel and the round power button at the top of the front panel.
Related: Smallest Micro ATX Cases
There is a pre-installed 120mm exhaust fan and the opening for the motherboard’s I/O both are located at the bottom of the rear side of the Raijintek Thetis PC case. There are seven expansion slots just above them. There is an additional piece placed on the screws, since the screws are on the outside. Raijintek has routed the plug for the power supply to the top-right of the rear side of the Raijintek Thetis PC case.
The front I/O panel is located on the top of the front panel which has two USB 3.0 ports, a microphone jack and a headphone jack. The Raijintek Thetis PC case can support 129mm fans or even a 240mm radiator on the top of the case. This opening on the top of the Raijintek Thetis PC case has a metal mesh which has a plastic frame. The bottom of the Raijintek Thetis PC case is where the power supply bay is located and another 120mm fan mounting location. Several mounting points for a hard drive are also located here.
Removing the side panels of the Raijintek Thetis PC case reveals the interior of the case which looks quite simple and lacks individual mounting plates or drive bays. In order to enable storage expansion and cable management, Raijintek is using the space on the motherboard tray.
With about 20mm space behind the motherboard tray, it is enough to install 2.5″ drives and allow the builders for basic cable routing for a cleaner look. This side of the motherboard tray has two mounting positions for such drives.
The bottom of the Raijintek Thetis PC case supports an additional 120mm fan. You can choose to install a 3.5″ hard drive here instead.
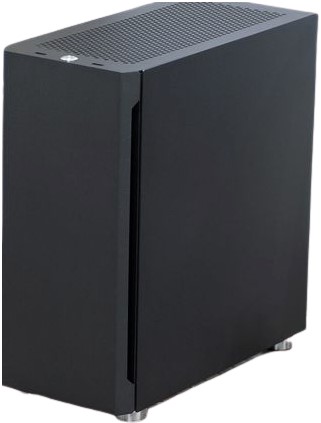
| Dimensions | 454mm x 140mm x 371mm |
| Motherboard | Micro-ATX, Mini-ITX, ATX |
| 3.5” Drive Mounts | 2 x combo 3.5″ or 2.5″ |
| 2.5” Drive Mounts | 2 x combo 3.5″ or 2.5″ |
| Fan Support | 3 |
|
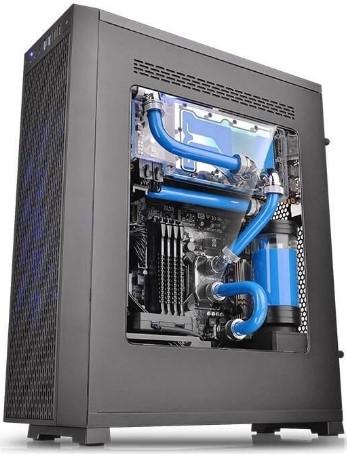
Thermaltake Core G3 PC case is keeping the style that has made this line of PC cases so well accepted, but the Thermaltake Core G3 PC case’s main reason is to bring the ATX gaming into the living room. With such a compact design which allows the high-end components to be installed in order to allow gaming at 4K and with VR, from your couch.
There are two 120mm Turbo fans installed at the front of the case. There is a cage for storage drives inside the case too where you can either install two 3.5″ drives or 2.5″ drives. The Thermaltake Core G3 PC case has only two expansion slots, although the Thermaltake Core G3 PC case allows support for Micro-ATX, Mini-ITX and ATX motherboards.
The Thermaltake Core G3 PC case stands almost as tall as an average mid-tower PC case while from the front it is slim from side to side. The Thermaltake Core G3 PC case’s front panel is mostly made of plastic and has rounded slits cut out of it. This leaves a little bit of solid plastic for the front I/O panel at the top of the front panel.
Thermaltake Core G3 PC case’s front I/O has a couple of activity LEDs, a reset button, a microphone jack, a headphone jack, two USB 3.0 ports, two USB 2.0 ports and the power button.
Related: Best Silent PC Case
Thermaltake Core G3 PC case’s top is painted black and is made of steel and the magnetic plastic dust filter takes up most of it. The PC case has enough space under this dust filter for a fan.
There is a clear plastic window on the right side panel of the Thermaltake Core G3 PC case. There is steel around it and at the top are slits backed with a magnetic dust filter.
The bottom of the Thermaltake Core G3 PC case has a ventilation pretty much like the top and it is also covered with a magnetic dust filter.
On removing the front panel we find a removable dust filter which is held in with tabs around it. There are two 120mm Turbo fans pre-installed at the front.
Inside the case at the front of the chassis located on the bottom is a removable storage drive rack. It has mounting holes for two 3.5″ drives or two 2.5″ drives.
The top of the Thermaltake Core G3 PC case has the optional 120mm fan locations.
There is about 3mm of space behind the motherboard tray which is enough for wiring.
| Dimensions | 380mm x 172mm x 358mm |
| Motherboard | Mini-DTX, Mini-ITX, ATX, E-ATX |
| 3.5” Drive Mounts | 2 x 2.5″ SSD/HDD |
| 2.5” Drive Mounts | 2 x 2.5″ SSD/HDD |
| Fan Support | 5 |
|
The Kimera Industries Cerberus X has an amazing look and is quite small for an ATX PC case.
The increased height of the Kimera Industries Cerberus X PC case allows it to be more friendly with water-cooling. The bottom can support 240mm radiator.
If we place tubing on the front panel, it will cause some proximity with a SFX-L power supply, so using a SFX power supply will be better.
While the motherboard faceplate fits perfectly, the CPU mounting hole on the back is a little offset, but still mounting an air cooler is easy.
Related: Best Airflow PC Cases
The Kimera Industries Cerberus X has eight expansion slots, with the motherboard’s rear I/O opening just above it and right next to it is the mounting location for an exhaust fan. The power cable for power supply is routed to the back of the case, since the power supply bay is at the front of the case.
The front I/O panel is located at the top of the front panel and it has two USB ports and a power button in between. Just behind it is a mesh at the top of the case.
At the bottom of the case, there is another mesh pretty much like on the top of the case and it supports two 120mm fans or two 140mm fans.
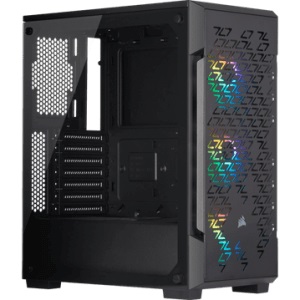
| Dimensions | 395mm x 210mm x 450mm |
| Motherboard | Micro-ATX, ITX, ATX |
| 3.5” Drive Mounts | 2 |
| 2.5” Drive Mounts | 2 |
| Fan Support | 6 |
|
The Corsair iCue 220T is an intriguing re-imagining of what is probably the most important piece of case design which is good airflow.
Having a very outlandish design, Corsair iCue 220T introduces a new style for the front panel, going for a characteristic which usually does not favor perforated metal or solid panels. The front panel of the Corsair iCue 220T PC case has parallelogram cutouts that make the pressed-steel front panel more beautiful and provides a unique look. These also as ventilation holes which provides the fans in the front with a good amount of air.
Even though the case has three RGB 120mm fans, still Corsair has put the iCue 220T PC case as a budget PC case. It is a bold move by Corsair, especially with the case having such a unique style, tempered glass side panel and the included fans.
The front panel is held into place with four individual metal pins at each of the corners, securing into latches on the front of the chassis. The sizable protruding cutout at either edge of the panel itself provides a 4cm gap between the front perforated steel plate and the front intake fans.
Related: Best Alternatives to the Dancase A4-SFX & Louqe Ghost S1
There are three Corsair iCUE SP120 RGB Pro fans that the case comes with, they are plugged in an integrated RGB controller that does not control the fan speed and only controls the lighting.
Having a different internal design than most of the Corsair’s other PC cases, the Corsair iCue 220T PC case stands out. This PC case has a full-length power supply shroud. It also has cable pass-throughs for the GPU cut out of it and many rubber grommets in place everywhere else that keeps all of the cables out of the way and tidy. On the back of the motherboard tray, you will find a two-slot 3.5″ hard drive caddy in front of the mounting location for the power supply and two 2.5″ SSDs mount on the back of the motherboard tray. There’s also the choice to mount the power supply in either fan orientation, whichever you prefer.
The front of the Corsair iCue 220T PC case supports either 2 x 140mm or 3 x 120mm fans, 2 x 140mm or 120mm fans at the top of the case and a single 120mm fan in the rear. You should not face any problems if you want to mount a 240mm AIO at the top of the Corsair iCue 220T PC case since the top fan mounting positions are offset from the motherboard tray.
Even though the Corsair iCue 220T PC case is a little bit on the smaller side for a mid-tower ATX PC case and internal space is a little bit compact than most. But, Corsair iCue 220T PC case supports up to full-ATX form factor and GPUs up to 300mm. You will probably not be able to put much else in the case in terms of bulky hardware.
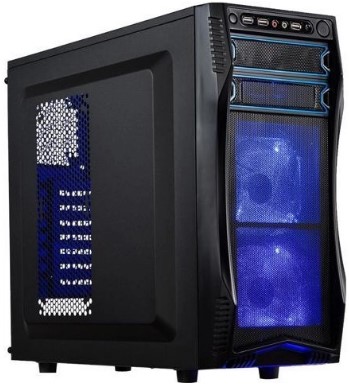
| Dimensions | 408mm x 185mm x 445mm |
| Motherboard | Micro-ATX, ATX |
| 5.25” Drive Mounts | 2 |
| 3.5” Drive Mounts | 3 |
| 2.5” Drive Mounts | 2 |
|
Computer component installations has been made absolutely easy by the Rosewill Challenger S PC case as it offers tool-free assembly of 3.5″ Hard disk drives and 5.25″ devices.
The Rosewill Challenger S PC case offers support for up to a 120mm long liquid cooling radiator in the front of the case and also supports up to a 14.17″ long graphics card. There are dust filters located at the bottom of the case and at the top of the case to provide a neat and well-organized function of the system.
Rosewill Challenger S PC case comes with two fans, one located at the rear and one located at the front of the hard drive slots. Inside the case at the top of the case, the mounting locations for three fans are all covered with a dust filter.
It is not easy to clean the filter without taking away the fans, but you can clean up the filter by using a vacuum cleaner which will suck up the dirt from the top of the case. The dust filter at the bottom of the case has a removable dust filter that slides out easily to clean it up.
The front I/O panel is located at the top of the front panel and it includes two USB 3.0 ports, two USB 2.0 ports, a microphone jack, and a headphone jack.
The Rosewill Challenger S PC case has slots for two DVD drives and three 3.5″ hard drives. There is a removable 5.25″ bracket if you prefer a fourth 3.5″ hard drive and one DVD drive.
The Rosewill Challenger S PC case is quite spacious and also has a side window panel. Back side of the motherboard tray has enough space that allow the builders to route even thick power cables.
The Rosewill Challenger S PC case also has a good number of fan mounting locations in order to provide a good amount of airflow.
The Rosewill Challenger S PC case has a good build and allows the users to access the components quite easily.
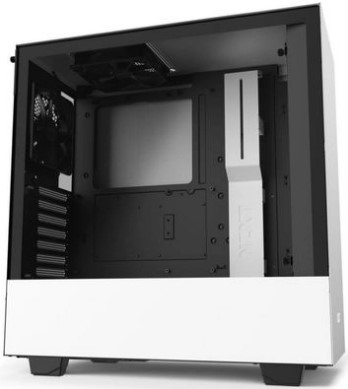
| Dimensions | 210mm x 460mm x 428mm |
| Motherboard | Micro-ATX, Mini-ITX, ATX |
| 3.5” Drive Mounts | 2 + 1 |
| 2.5” Drive Mounts | 2 + 1 |
| Fan Support | 4 |
|
The H-series by NZXT is know for their clean lines and style design and the NZXT H510 PC case is no different from that. The tempered glass panel on the side of the case is mounted flush without any screws on the side.
NZXT H510 PC case’s glass panel does not reach to the bottom of the case, instead, it just sits flush into a small metal side section which is the side of the power supply shroud.
The front I/O panel is located at the top of the case and it has a USB type-A port, a USB type-C port, a dual audio jack, and a power button.
There is a side ventilation to provide the front fans with a good amount of airflow. This will work as indirect airflow which will help in reducing the fan noise too.
The side ventilation might look a bit restrictive, but there’s a huge airflow channel behind it along with a dust filter on the side panel.
The back side of the NZXT H510 PC case is in black color as well as the interior of the case is black too. Well, this will help in hiding most of the cables and fittings with the color alone.
There is a single 120mm exhaust fan at the top of the backside of the case. The fan is NZXT’s own premium quality fan and it is in black which goes with the theme here.
You will find seven expansion slots below that. At the bottom, there is the ATX power supply mounting location. The mount has a slide-out dust filter.
NZXT H510 PC case’s side panel can be removed with just a single thumbscrew located at the rear. This helps in quick and easy access to the case interior.
NZXT H510 comes with a power supply shroud at the bottom which hides all the cables.
The NZXT H510 PC case comes with two fans and both are setup as exhaust. The case is designed to have an AIO at the front panel, but you can move the fans around if you want to, since there is no intake fan.
| Dimensions | 440mm x 170mm x 358mm |
| Motherboard | Micro-ATX, ATX |
| 5.25” Drive Mounts | 1 (supports 1 x 3.5″ or 2 x 2.5″) |
| 3.5” Drive Mounts | 2 (one supports 1 x 2.5″) |
| 2.5” Drive Mounts | 1 |
|
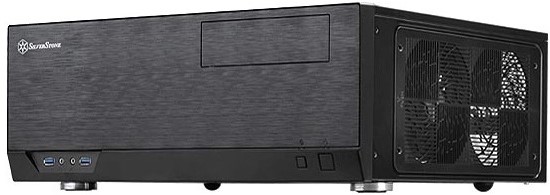
The SilverStone Grandia GD09 PC case is aimed at home theater enthusiasts. This PC case isn’t a small form factor PC case, but it’s compact enough to fit in quite a lot of places where some ATX PC cases will not fit.
The SilverStone Grandia GD09 has quite a lot going on inside the case, despite how small it is. The case has a full cross-brace which is quite unusual at this price point. The SilverStone Grandia GD09 PC case comes with a single 120mm fan which is mounted as an intake just next to the CPU mounting area. You can mount two additional 120mm fans in this case, one next to the power supply and one next to the fan that the case comes with.
The front I/O of the SilverStone Grandia GD09 features, two USB 3.0 ports, a microphone jack, a headphone jack, and a power button along with a multi-purpose drive tray in the corner of the case. The multi-purpose drive tray can support a single 5.25″ device plus one 3.5″ hard drive or two 2.5″ drives. If you forego any external drives you can use the top half as a 3.5″ drive bay. There is another 3.5″ drive bay hidden underneath and oriented vertically against the front of the case. You have to choose from the options that SilverStone provides the builders for example, you can mount three 3.5″ drives if you don’t install anything else in the bays.
There is a dedicated 2.5″ drive mount on the floor of the case. The finish and the fit of the SilverStone Grandia GD09 PC case is excellent. There is a texture to the paint job. The chrome-plated screws used in the case really give a classy look to the case.
| Dimensions | 380mm x 250mm x 370mm |
| Motherboard | Micro-ATX, Mini-ITX, ATX |
| 3.5” Drive Mounts | 2 |
| 2.5” Drive Mounts | 3 + 1 |
| Fan Support | 5 |
|
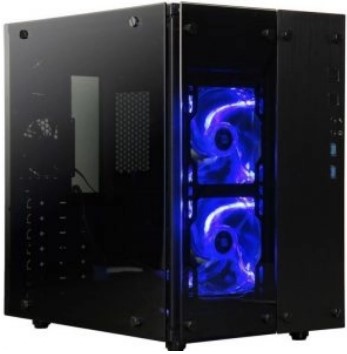
The Rosewill Cullinan PX Series PC case is a steel and glass PC case. It is a small form factor case, but it is an ATX PC case and has a dual-chamber layout on the inside of the case.
The Rosewill Cullinan PX Series PC case has tempered glass on the side as well as the front with a solid brushed metal front panel just on the right side of the front tempered glass.
The front I/O panel is located vertically on the solid brushed metal front panel and it has two USB 3.0 ports, a microphone jack, a headphone jack, and a power button.
The Rosewill Cullinan PX Series PC case has an elegant look and design. The Rosewill Cullinan PX Series PC case comes with three fans pre-installed, one on the rear side of the case for exhaust and two on the front side of the case for intake.
The front glass panel has spaces along the sides in order to provide the front intake fans with a good amount of cool air.
The top of the case has a metal mesh. On the back side of the case there are seven expansion slots, on its left side is the mounting location for the power supply, on top of it is the mounting location for the exhaust fan. There are two holes for the tubing on top of it as well.


![Best Airflow PC Cases 2021 [Buying Guide]](/img/best-airflow-pc-cases.jpg?nf_resize=fit&w=385&h=180)


![Best Smallest Micro-ATX Cases [Buying Guide]](/img/best-smallest-atx-cases.jpg?nf_resize=fit&w=385&h=180)
