Gaming PC needs extra speed and performance to run different games with high graphics and requirements. Operating systems play an important role in the enhancement of PC speed. Windows 10 is the latest operating system, and it’s been more than four years for the launching of this operating system.
Hopefully, all of you updated the operating system of PC from windows 7 or windows 8 to the latest Windows 10. Every hardcore gamer can agree that nothing can beat the gaming experience on a well-optimized PC and operating system. The latest Windows 10 make it possible for hardcore gamers to enjoy the extreme level of gaming.
Operating systems have a history of software malfunctions and bugs. Like the previous operating systems, unfortunately, Windows 10 is not free from faults. Although it is free from occasional crashes, recurrent, and force updates, it will slow down the performance overtimes. This slow down irritates the users, especially the gamers who have to deal with low performance and speed along with many other problems.
Today, we will give some suggestions to gamers to boost up the performance of PC with Windows 10. However, this will result in the loss of some exciting features, but we will try to keep them at their minimum.
No doubt, Windows 10 is something better than that of previous operating system platforms. But with the help of these tips, gamers can enjoy the speed of PC at its best and can attain the maximum performance.
We will also let you know about different modifications that go beyond windows 10 and helps to enhance the speed and smoothen the gaming experience. Although all these modifications are not free of cost, it worthwhile to keep them, especially if you want a better gaming experience on old PC.
Table of Contents
How to Speed Up Windows 10 for Gaming
1.Graphics Processing Unit (GPU)
The graphics processing unit is essential for displaying images, playing videos and games as well. To get the maximum performance of GPU’s users, especially gamers, must take care of the following things.
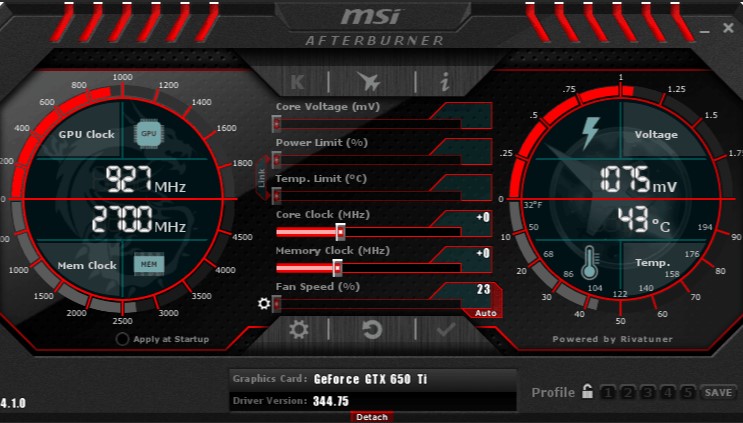
Overclock the GPU
Overclocking the GPU is a trick to enhance the performance because the gaming experience is dependent on the power of GPU irrespective of how much memory the PC has and the speed of the processor. Most of the time, the main reason behind the game crash is the performance of the GPU.
To enhance the PC performance, gamers have to look beyond the factory settings of GPU, or in other words, they have to go for overclocking, as in the past, overclocking was considered a significant threat to hardware. But now a day, most of the GPU turns back to factory settings automatically before damage if there is any threat to hardware.
But keep in mind; overclocking can result in an increase of stress and temperature of PC up to 05 °C. It’s not just for CPU or GPU, rather than it disturbed all the hardware of CPU. Therefore, extreme care should be taken while overclocking.
However, a slight overclocking is not risky. Therefore, we recommend overclocking the GPU in the range of 10 to 15%. It will surely work well without hurting the PC or any hardware.
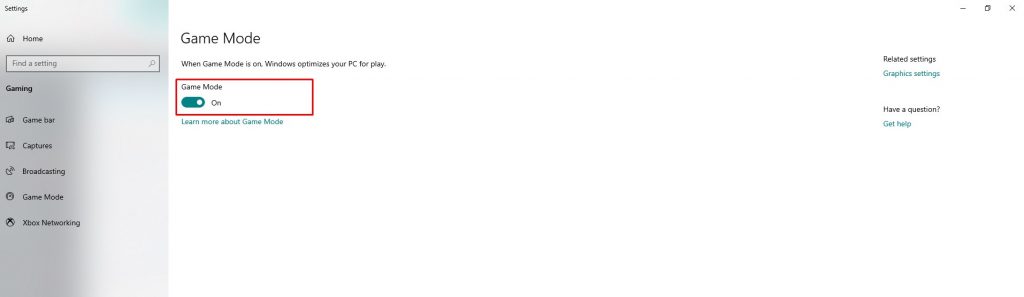
2.Activate Gaming Mode
In recent years, Microsoft has realized that gamers face performance issues while playing games. Therefore, they include a gaming mode feature in the latest versions of Windows 10. This feature is useful for increasing gaming performance by attributing the resources of the PC to the game.
This feature enables gamers to stop the different background programs from using the resources and free up the RAM to use in the game. Some people argue that this feature is useless and doesn’t have any significant impact on the performance, but you can try this feature for better results.
To enable the gaming mode, press the windows and G button over the keyboard at the same time and select the game mode for this game and allocate the extra resource in the game.
Moreover, the game mode suspends the auto-updates of windows. Never mind getting some extra FPS.
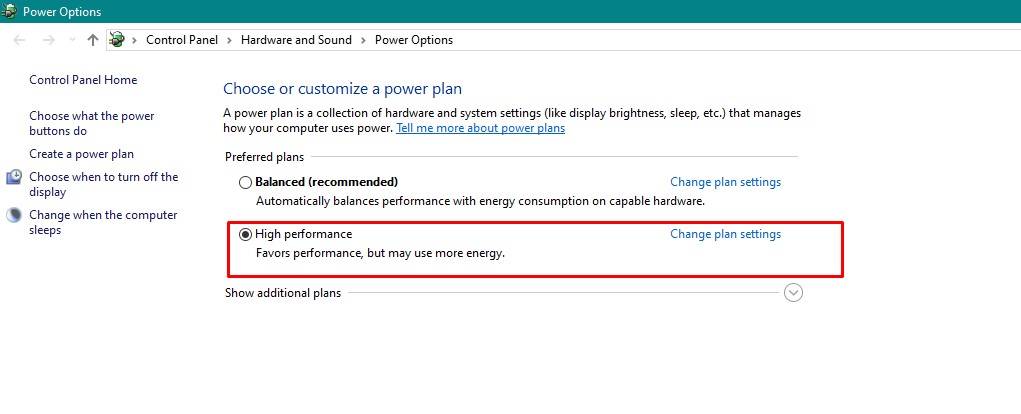
3.Customize Power Plan
By default, Windows 10 select the balanced power plan. In this power plan, PC automatically adjusts the CPU frequency and uses the minimum level of power that is required to run the current task. It is also possible that your PC is using the power plan which saves energy by compromising on performance.
Gamers have to select the high-performance plan in Windows 10 while playing the games. This power plan uses more power to increase the performance of the machine.
To select the high-performance plan, follow the below-mentioned steps:
Go to Power & sleep settings
Select additional power settings
Choose high-performance plan
If a high-performance plan is not shown, click on create a new power plan and select a high-performance plan from the left side of the screen.
4.Windows Updates
Windows update feature is important to keep your system up to date with new additions to boost up the performance. But sometimes updates disturbed the gaming experience. To avoid any problem with performance while playing games must take care of the following.
1. Turn off automatic updates and restart
Having the latest features in the operating system is not a bad idea, but it creates a problem when windows start to download and install automatic updates. This disturbs the performance by using the performance resources. Therefore, it is recommended to deactivate the auto-updates feature and download the updates manually.
Follow the following steps to deactivate the automatic updates:
Go to windows update setting (you can search by typing it in the search bar)
Click on advanced options
Select a date to Pause updates
There is also an option to delay the windows updates up to 35 days.
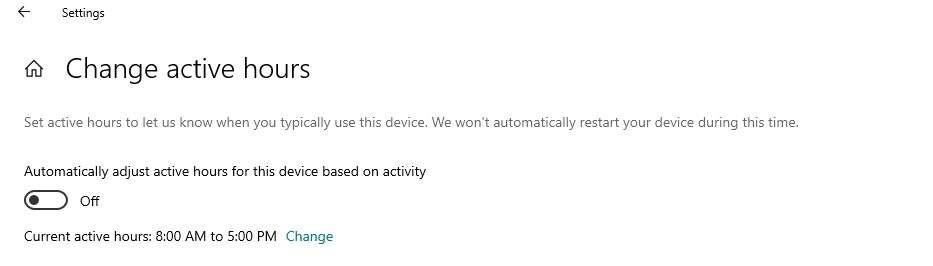
2. Set The Active Hours
If you don’t want to update the windows manually or don’t have time to complete the process, you can use the active hour’s feature. Windows 10 can automatically download and install the updates if you set your active hours correctly. Windows 10 complete this process during inactive hours when you are not using your machine.
To configure the active hours, follow the following simple steps:
Go to settings
Select update and security
Change active hours
Completely turns off the updates are considered a significant risk for security. Therefore, it is recommended to use active hours feature. It is useful for updating windows and also avoids updates and restart during working or playing the games.
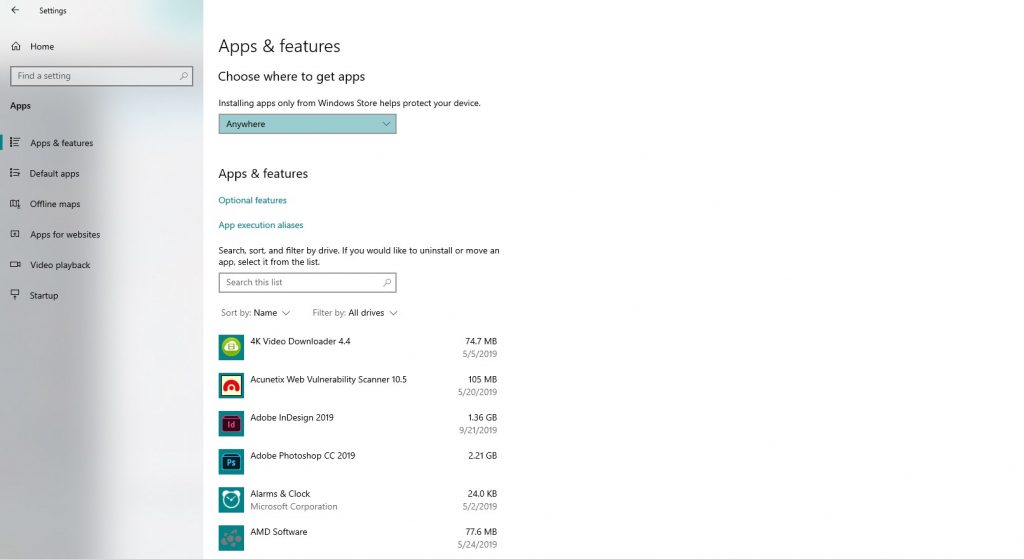
5.Uninstall Un-necessary Software
Un-necessary software is the program that you install in the PC but never use it again. Most of these programs always run in the background. You may install these programs with other applications by mistake and left them without removing them from the machine.
Therefore, it is necessary to uninstall these programs. As a result, you can free up the RAM, energy resources, and disk space as well. All of these are important to increase performance.
With the help of following simple steps, you can easily remove these programs from your system and enhance the performance.
Go to control panel
Click on uninstall or change program
Select a program to uninstall
Click on uninstall button
Some programs may require restarting the system after successful uninstallation.
Must take proper care while uninstalling the programs and make sure that the program you are going to uninstall is not useful for you anymore.
6.Improve Boot-Time
Windows boots up quickly when new operating system installs but subsequently increases the boot time after some months. It also slows down the performance of the PC due to some mysterious reasons. But what are the reasons behind this?
The main reason behind slow bootup time is the programs that you set on a schedule to run on startup. There may be a variety of programs that run with startup and slow down the performance.
Some of these programs may set automatically on schedule to run after startup while some ask for permission to run on startup. You may also set some programs on automatic mode to run that you need for working most of the time.
But you have to clean up the startup schedule irrespective of the reason for adding. This helps to boost up the boot time.
Follow the below-mentioned steps to clean up the programs from startup.
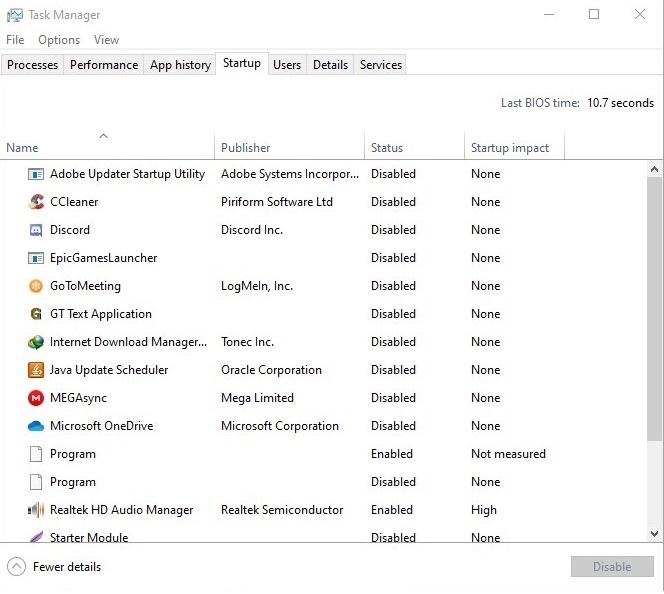
Go to task manager
Click on the startup tab
Eliminate all the unnecessary programs that you don’t need to run at that time
In the list of the startup, you can find all the programs that set to run on startup. There you can also find some additional information about every program. You can find the impact on speed due to programs that run at startup process.
It is simple and easy to deactivate the program to run from the lower right corner. For better optimization of the startup, it is recommended to disable all the unnecessary programs even if they have minimal impact.
However, you can keep the program that has a high impact on startup time, but you have to run immediately after startup every time.
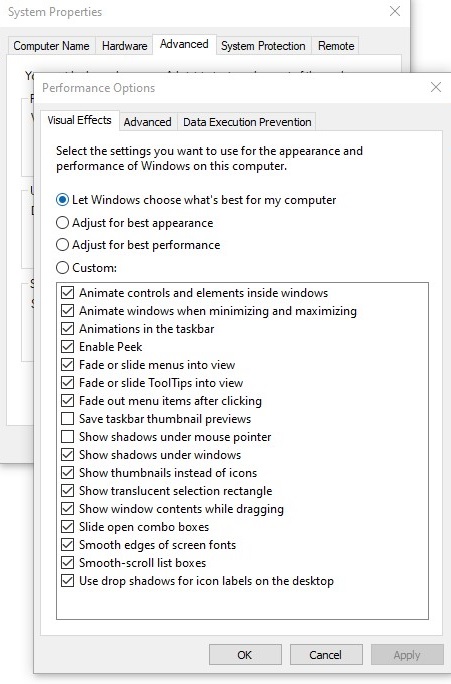
No doubt, new PCs are come with high-performance features and don’t have more impact with high visual effects, but it works very well for old and low-performance PCs.
Because Windows 10 keeps some fancy visuals that slightly affects the performance of low-end computers, primarily if these systems use APU or iGPU.
To adjust the visual effects at low performance, follow the below mention steps:
Go to advanced system settings
Select performance settings
Adjust for low visual performance
8.Hard Disk Drive
HDD is another component to run the operating system and also plays an important role in the performance of the PC. With the passage of time, many temporary files sum up in the registry during browsing and installing different programs.
These junk files collectively affect the PC performance, and if users don’t remove them frequently, it will create different problems. There are various ways to avoid problems due to these problems.
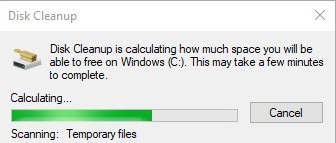
1.Disk Cleanup
A fantastic built-in app comes in the Windows from many generations to eliminate the unnecessary files from windows. This app remains underrated because it does a great job of freeing up the space that is occupied by different junk and temporary files.
It is very simple and easy to use this app in following simple steps:
Type Disk Cleaner in the search box
Click on the desired result
Select the Windows drive to assess the temporary files
Disk Cleanup organize the files before removing and provide you with a description of all the files to check and confirm the deletion
After hitting the delete button, the action center displays a message and asks you to confirm the delete process.
After confirmation, all the unnecessary files there will be removed from your PC.
This app is an excellent tool to clean up the disk and free up the disk space. It is helpful to maintain the performance and speed of the PC while playing the game. If you are not ever using this app, surely you are wasting your time.
2.CCleaner
It is third party software used to remove the temporary files from the junk folder. If the built-in disk cleanup doesn’t work, install this software online.
It is free to use up to some extent, but there is also a paid version that facilitates the users at an advanced level. But if you want just to remove temporary files, just install the free version.
It is easy to install, and you can install it through following simple steps:
Go to the official website of CCleaner
Go to the download page
Click on download free version
Install the downloaded file
After installation, CCleaner provides you with a list of programs installed on your PC and ask you to select the programs you want to scan and remove temporary files with CCleaner.
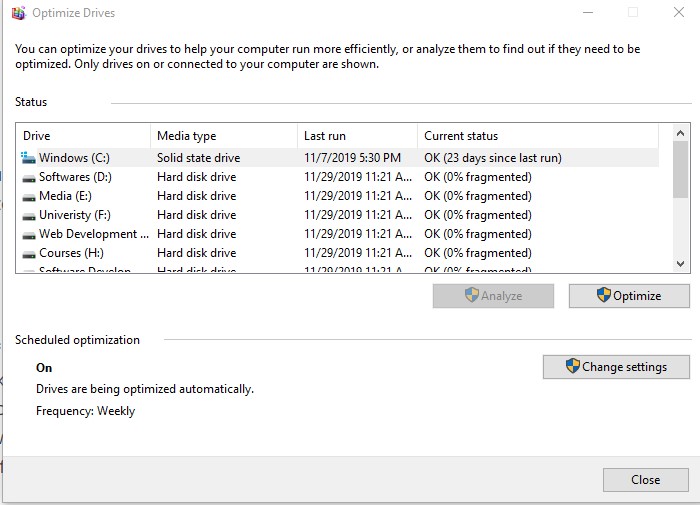
3.HDD Defragmentation
Defragmentation is important for the health of your hard drive and improves the efficiency of the operating system. During working, the disk spins under the arm to read and write the data excessively. During this process, different files split into multiple parts on the hard drive.
This usually happens when there is an excessive load of writing and reading involved. Therefore, it significantly affects the speed of HDD and slows down the performance.
With the help of the defragmentation process, you can defragment all the data and organize it appropriately. Regular defragmentation prolongs the lifespan of HDD and helps to maintain the performance. It is easy to carry out defragmentation in a couple of steps. Let’s take a look at them.
Open my computer
Right-click on the drive you want to defragment
Click on properties
Select defragment now under the tools tab
Analyze the position of different files
Press defragmentation
It may take some time to analyze the disk and some more time for the defragmentation process. But once it completes the defragmentation process, it will definitely improve the performance and speed of PC.
Users have the option to pause the process and start later on from the same point or can set a schedule for automatic defragmentation. But keep in mind if you are going to set a schedule for it, make sure to set the time as per inactive hours.
Because this process needs some power and resources to complete the defragmentation process, and you can do it during idle hours.
Moreover, there is no need to defragment the different solid-state storage devices like SSDs, flash drives, and memory cards, etc.
4.Switch to SSD
Switching to an SSD is something more on the gaming side, but it’s an effective way to increase the speed. However, the use of SSD doesn’t increase the speed for gaming, but it will become definitely effective for reducing the screen load times.
Maybe some people don’t afford to have separate SSD for both operating systems and gaming because these drives are expensive as compared to that of HDDs. But you can use small SSD for the operating system and a big HDD for gaming purposes.
Some people argue that loading screen times in not a big deal. However, with the passage of time games are coming with different advanced features and function that requires more space. An increase in size definitely has an impact on loading screen time.
For example, GTA SA required just 2 gigs of disk space in the past, and later on, the next version GTA IV requires about 18 gigs of space, and the latest version of GTA V requires more than 76 gigs of space.
To maintain and gain the maximum performance, we must consider switching from HDD to SSD. It will surely increase the performance from 10% to 25% depending on the features of the game.
9.Deactivate Nagle’s Algorithm
Nagle’s algorithm is useful to enhance the efficiency of TCP/IP networks by minimizing the number of packets that are required to send over the network. But having this algorithm may create problems while playing games online.
To deactivate this algorithm for improving the performance, follow the below-mentioned steps:
Go to Regedit by typing it in the start menu
Copy and paste the following path in the address bar (HKEY_LOCAL_MACHINE\SYSTEM\CurrentControlSet\Services\Tcpip\Parameters\Interfaces)
In the left sidebar, you will find a variety of folders with filename comprise of a combination of letters and numeric digits.
Find your IP address with the itemized DhcpIPAddress file
Find the “IPv4 address” registered under the current connection to detect the IP address
After detection of IP address of internet connection, right-click on the analogous folder and go for New > DWORD (32-bit) Value.
Create DWORD values with the name TcpAckFrequency and TCPNoDelay and double click on both to set the parameters to 1.
This disables Nagle’s Algorithm by activating the two parameters.
If you face any problem in the running, change the parameter value to 0 to disable them.
Conclusion
In the above article, we discuss all the significant aspects that gamers must consider to maintain and improve the performance to run the games smoothly and experience better results.
No doubt, Windows 10 is a very powerful operating system, but it is held back by different flaws that come when Microsoft tries to integrate some social and mobile features. However, it is not perfect, but it is an excellent option to run this operating system.
This operating system has a lot of attractions for hardcore gamers due to the inclusion of DirectX 12, along with many other game optimization options.
How can I improve my computer’s gaming performance?
Always keep a check on PCs airflow and upgrade cooler fan. If needed re-apply thermal paste once at least in a year. Try upgrading the Graphics card if you have any old ones. Try upgrading RAM if it lags a lot. These are some ways you can improve your computer’s gaming performance.
How do I optimize Windows 10 for gaming and performance in 2021?
Clean up your disk. Try performance trouble shooter and delete the programs you never use. Use windows 10 gaming mode and Use faster DNS servers. Also, prevent automatic updates of steam. These are some of the many ways you can optimize your Windows 10 for gaming and performance in 2021.
How can I make my windows 10 2019 faster?
No special effects, Disable Startup programs, Find and fix the problem, Reduce the Boot Menu Time-out, No tipping, Run Disk Clean up, Eradicate bloatware, delete the software and programs you don’t need, and boom! Your Windows 10 is officially working fast now.
Zakriya is right from Pakistan. He was raised with a quest for gaming craze with an organization of specialized folks. This is the place he understood that computer games can grow your creative mind to unlimited universes. Gaming is no longer for him only a method for amusement, yet enthusiasm. From the youthful age of 8, gaming was simply the main method for communicating. At whatever point he got the opportunity to play computer games, he took it with two hands and played for quite a long time. Much to his dismay that gaming would turn into his closest companion.
ProTechReviewer is reader-supported. When you buy through links on our site, we may earn an affiliate commission.